
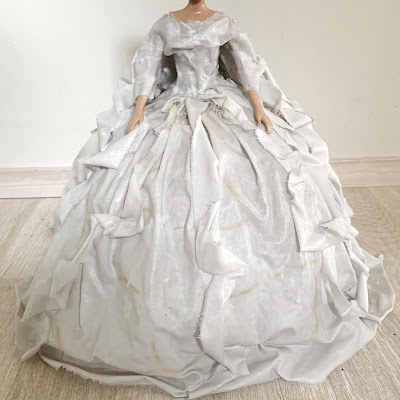
My first ever altered doll was born! I saw a delightful challenge by Finnabair, Magical Toy Shop, and thought that if I was to take part, I'd definitely alter a barbie doll. Then, as an afterthought, I wondered, well, why not. (That, my friends, is usually a very good question to ask yourself. Life is too short not to try.) I negotiated with my daughter (7), the Master of Dolls, and she graciously parted with one of her dolls, and so we began. Huge was her trust to her mother, as my promise of creating a beautiful queen started with this:
 |
| That's how it looked when we started. |
I took only a couple of photos along the way, as I really didn't trust myself to be able to keep my phone clean... So, there are photos of only a few phases, but I'll tell you how I did it, anyway.
STEP 1: A doll, old bed linen, and wire.
My first task was to tackle a problem of making a base for the doll to stand free and also to support all the fabric layers. How lucky of me to have spent my whole childhood with my sister, creating crinolines for fashion dolls out of either pipe cleaner (a luxury) or of our mother's freezer bag wire closers (you know, I lost the word, the tiny wires covered with either paper - a bonus - or plastic - not so good for crinolines but would do in emergency situations) and sewing countless dresses, mainly in the lines of Little Women, Anne of Green Gables, and Sissi (Sisi, the Empress of Austria).
So, I was no damsell in distress, but felt rather quite at home - although I must admit that the task was quite a very much easier with a roll of wire and wire cutters than with teeny tiny plastic bag closers sneaked from kitchen behind our mothe's back (although there seemed always to be abundant supply of the clips, so it just might be that our mother suspected something going on)...
I started with measuring the hip of the doll and making sure I could later slip her through the waist hole. Then I took a suitably sized plastic bowl from kitchen (no sneaking needed this time, which made me a bit deflated) and started to mould a crinoline. I started with four vertical wires (divided quarterly) and attached them to the waist hole, then added four more, and then four more, all the time trying dividing them evenly and lefting a bit too long wires, so I could decide the lenght later.
Then I started working horizontally, all the time pressing the wires to the plastic bowl, so it was going to be just the right size and shape, I twisted a long horizontal wire around every vertical line. First a bit narrower width, then a bit wider circles, and in the bottom of the skirt, the widest circle after testing the suitable height with the doll. Easy, and quick, much easier to do than trying to descripe how to. Here's how the crinoline looked when finished:
 | ||
| Step 1: wire crinoline. |
STEP 2: Making the skirt.
Next, it was time to crinkling a lot of fabric over the crinoline. I ripped two widths from the old bed linen (approx. 150cm each), and then protected our living room table with large garbage bags, took out lots of kitchen papers, a pair of rubber gloves, and a roll of kitchen foil. My daughter found me a football, around which I wrapped foil and a plastic bag to make it sit evenly and making sure the wire will keep its shape eeven with layers and layers of heavy, wet fabric. Then, to work.
I was going to test how to stiffen fabric with Finnabair products but I must confess I made a short cut as my daughter was very much waiting for the fun part (painting) to start, and before that we needed a hardened base. So, instead of testing how Soft Matte Gel or Heavy Body Gel or Modeling Past would work, I used the last of my bottle of PowerTex fabric hardener.
I dipped the first fabric piece into the liquid and made sure it absorbed the liquid evenly, and then started crinkling it ovr the crinoline, all the time making sure the fabric folds beautifully and airily. Then I did the same with the other fabric piece, and made sure the ends of the fabrics were folded neatly and invisibly.
After a couple of hours, when the fabric started to stiffen, we had watched a movie and were going to go to sleep, I secured the fabric with a few stitches to the crinoline waist, to make sure it won't slip during theee night. This is how it looked like at this point:
 |
| Step 2: skirt on the making. |
STEP 3: Attaching the doll to the skirt.
After the skirt was completely dry, I took out the football and slipped the doll inside. I put her standing in a jar filled with kitchen paper, to make sure she'll be standing in the right position all the time. I also protected her hands and face with kitchen foil.
Then I ripped lots and lots of fabric into approx. 2-3cm wide lengths and cut them into maybe 30cm pieces. Again, I soaked the fabric pieces one by one in the liquid, and started to mould a bodice and thus attaching the doll into the skirt. I simply wrapped these fabric pieces around and around the doll, and when it felt sturdy enough, I also wrapped some fabric around her arms to make sleeves. After that, I added lenghts of those thin fabric strips to the skirt, folding and flowing here and there, and for the backside, I added lots and lots of layered fabric strips to make sure there was enough support for the hair later. I must say it looked so pretty and flowing and airy and light, that I was really tempted to make a switch of plans and create The Snow Queen instead of The Queen of the Night! But we were settled on the night theme, so maybe a snow queen later...
Here is how the doll looked after everything was hardened. There's still protection over her face and hair and hands, to make sure we would not paint them over with black gesso. After taking these photos I added laces and ribbons to her head as hair, but forgot to take photos... I worked the same way, dipping the laces and ribbons to the hardener liquid, and attached them to her head.
 |
| Step 3: hardened skirt, front. |
 | |||||
| Step 3: hardened skirt, from right. |
 |
| Step 3: hardened skirt, from left. |
STEP 4: Black gesso & decorations.
After everything was hardened, the skirt, the folds, the sleeves, the hair, we set to gessoing the whole doll with my daughter. We used black gesso by Finnabair. Then we attached the embellishments with Finnabair Heavy Body Gel. We used (a lot of) Tim Holtz's metallic stars and (a lot of) Finnabair's diamond art pebbles and covered the entire skirt and bodice with them. Like this:
 |
| Step 4: gessoed and embellished doll, from right. |
 |
| Step 4: gessoed and embellished doll, front. |
 |
| Step 4: gessoed and embellished doll, from left. |
STEP 5-XZY: Painting, painting, painting.
Then it was time to paint. And paint. And then paint some more. We didn't calculate the layers, but there were many of them. My seven years old is very, very sovereign painter, and I must confess I couldn't tell which parts were her painting, which mine, after the first couple of layers!
We used a lot of colours... We started with Finnabair Metallic Paints, then added some Impastos, and Mica Powders, liquid Acrylics, and finally Metallic Waxes. Oh, and finished the queen with a crown, of course!
For the base we mixed these:
- Art Alchemy Sparks Night Shadow
- Art Alchemy Metallique Stormy Ocean
- Art Alchemy Metallique Plum Preserves
For the base of highlighting the extra folded fabric stripes of the skirt:
- Art Alchemy Metallique White Pearl
- Art Alchemy Metallique Silver Spoon
For contrast:
- Art Alchemy Impasto Paint Pitch Black
- Art Alchemy Impasto Paint Snow White
For shadowing all the folds:
- Art Alchemy Liquid Acrylic Ink Black
For highlights:
- Blue and Silver from Art Incredients Mica Powder Set Serenity
- White and Gold from Art Incredients Mica Powder Set of 6
And finally, the waxes:
- Art Alchemy Metallique Wax Vintage Gold
- Art Alchemy Metallique Wax Old Silver
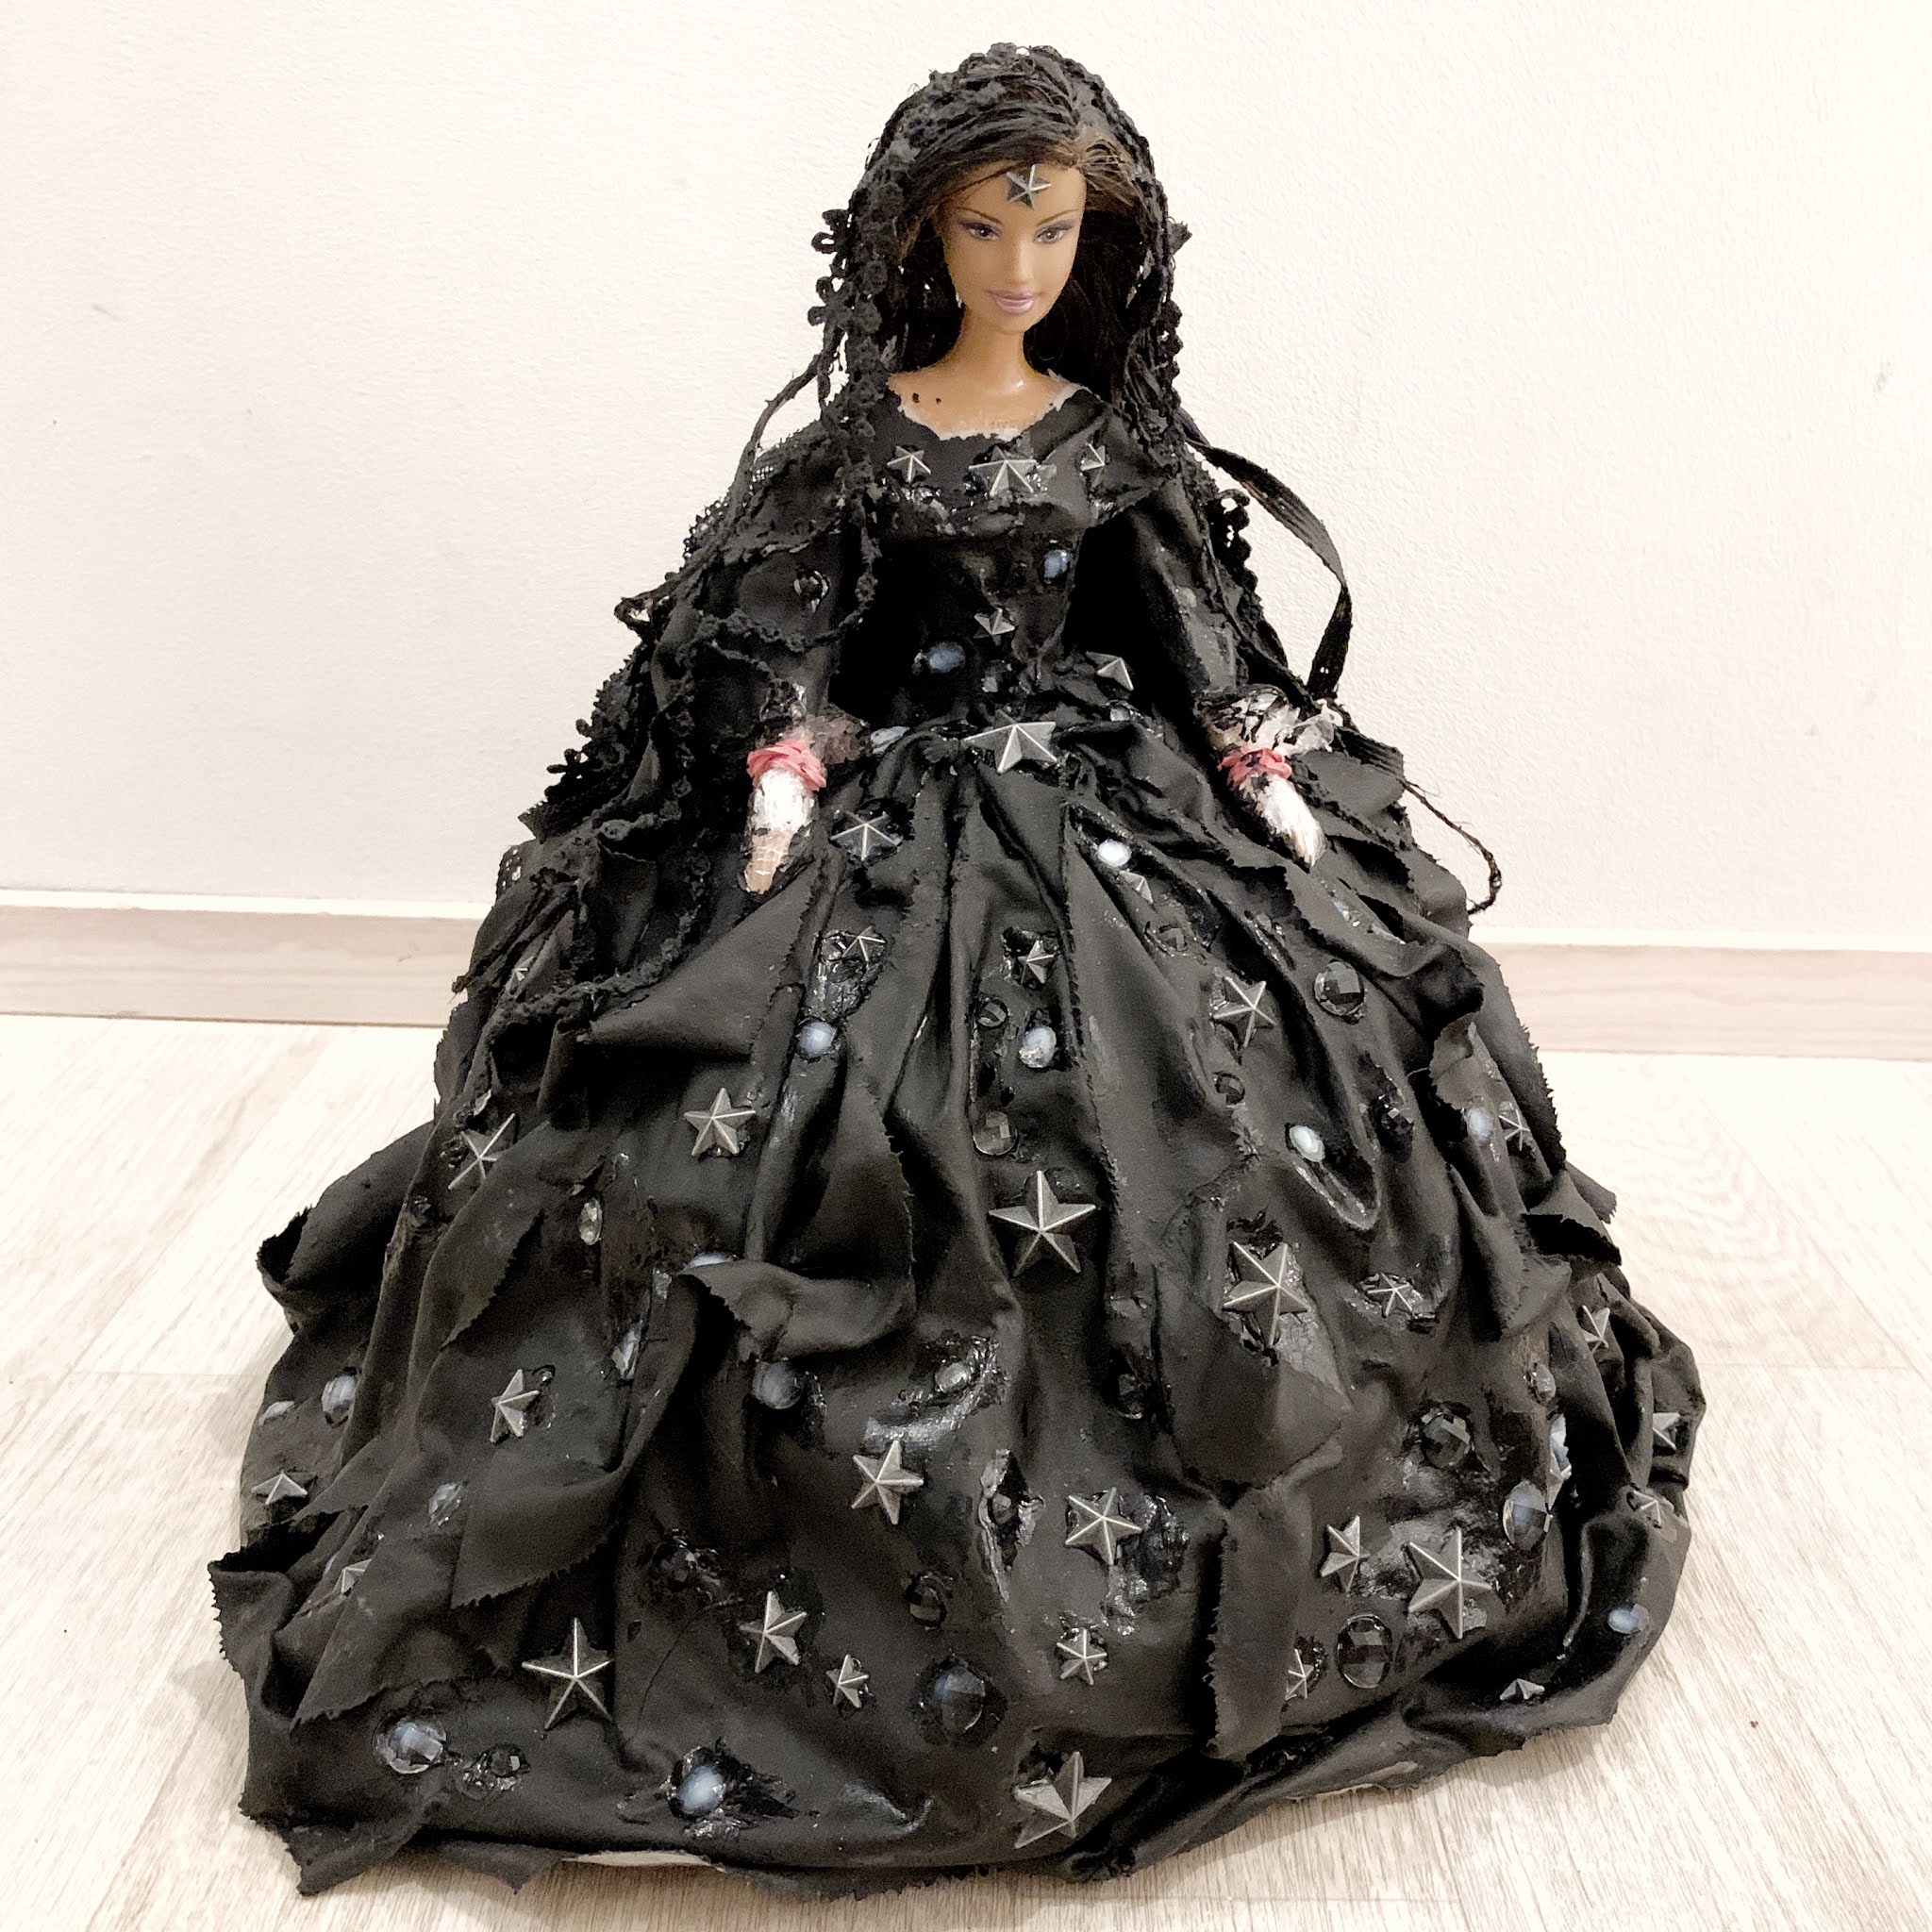
The doll ended up to be almost 50cm wide and 30cm high, so it was quite a challenge to photograph it. Here are lots and lots of photos, general and close ups, to get you the idea how detailed it is.


