Showing posts with label tutorial. Show all posts

Sunday, 18 July 2021

Sea Breeze - Artsy ATCs for Finnabair


Summer has been extremely and unnaturally hot here in Finland, and I really miss refreshing sea breeze. I wanted to test how a bit rough-on-the-edges sea painting could be done with Finnabair mixed media; something liberating and fresh, with generous brush strokes or strong palette knife lines. I have painted with artist quality acrylics and oils, but never tested how mediums designed for mixed media actually work for this purpose. So, I picked a couple of tiny ATCs and went all artsy.

First, I primed strong, heavy cardboard ATC bases with white Heavy Gesso, and crinkled tissue paper on top, using Soft Matte Gel. Then added another layer of gesso on top and started my experiments. I mixed some Paper Texture Paste and Mini Arts Stones to create a foamy, dimensional sea wave effect, and using palette knife, applied random, horizontal lines to the cards.


Next, I mixed Impastos Manor Blue, Snow White, and Linen to create a suitable sea-sky colour and added the colour with brush and palette knife, making sure not to be too neat. To create a bit depth, I then added just a hint of Liquid Acrylics, Prussian Blue, Ink Black, and Burnt Sienna, using mist sprayer and baby wipes to control the colours a bit.

Just for fun, I added a hint of Jewel Paste Golden Dust and Effect Paste Mermaid, to give the ATCs a gentle glow. The finished ATCs are not Old Masters art quality but then, they needn’t be – the point was to enjoy and test something new. With Paper Texture Paste, Mini Art Stones, and some crinkled-crumbled tissue paper, even the tiny ATCs got dimensional effect easily, and hence Impastos worked without any heavy medium needed to get dimensional oil or acrylic painting effects. I can only imagine what it could be, when you start playing with 3D pastes and all the works! Next in line, a proper canvas and large, splashing movements… Refreshing, like sea breeze.


Here’s a link to my tutorial video: https://youtu.be/b3p58fbICHs


Thank you for popping by!

Emilia


MATERIALS USED:


https://mixedmediaplace.com/prima-art-basics-heavy-gesso-white


https://mixedmediaplace.com/prima-art-basics-soft-matte-gel


https://mixedmediaplace.com/prima-finnabair-tissue-paper-nautical


https://www.primamarketinginc.com/product/art-extravagance-paper-paste-250-ml/


https://mixedmediaplace.com/prima-art-ingredients-art-stones-mini


https://mixedmediaplace.com/prima-art-alchemy-impasto-paint-dark-chocolate


https://mixedmediaplace.com/prima-art-alchemy-impasto-paint-pitch-black


https://mixedmediaplace.com/prima-art-alchemy-impasto-paint-linen


https://mixedmediaplace.com/prima-art-alchemy-impasto-paint-snow-white


https://mixedmediaplace.com/prima-art-alchemy-impasto-paint-manor-blue


https://mixedmediaplace.com/prima-art-alchemy-liquid-acrylic-ink-black


https://mixedmediaplace.com/prima-art-alchemy-liquid-acrylic-burnt-sienna


https://mixedmediaplace.com/prima-art-alchemy-liquid-acrylic-prussian-blue


https://mixedmediaplace.com/prima-art-alchemy-liquid-acrylic-ochre


https://mixedmediaplace.com/prima-art-extravagance-jewel-effect-paste-golden-dust


https://mixedmediaplace.com/prima-art-extravagance-mermaid-effect-paste


Thursday, 17 June 2021

Finnabair Creative Team - Summer Vintage Tags


Somehow, we have made it to the summer, again. Celebrating life seems like a proper theme. I seriously think we all need a trophy or two, getting through all kinds of unexpected things life has thrown at us lately, don’t you think? Even if the trophy would be a tiny one, in form of a tag, we definitely deserve one!

Summer is this mysterious time capsule where between spring and autumn, time flies, whirling and whistling, and it seems that in one single breath, it’s gone. For me, summer is marveling the blooming peonies, collecting falling rose petals, pressing lavenders, devouring Scandinavian strawberry and whipped cream sponge cake with kids under the huge maple tree in our garden, listening to birdsong while reading on our glass veranda… Time both stops and vanishes and although crafting is always there, somehow there isn’t time to do all the crafting I’d love to. And I thought this might be the case for a lot of craft lovers; there simply isn’t time for it all. 
 
 
Hence, I want to share with you this simple and easy, quick, and light happy tag project. You don’t need much time, energy, or materials for it – and basically, if you want to be in super lazy summer crafter mode, you can skip all the (two) mixed media steps, in which case the tag would take about 1,5 minutes to make, instead of five. 
 
 
Here’s the how.

I cut a 6x6” scrapbook paper and cut it into half and into a tag shape. (Actually, I made two tags and used two different papers, but you know. Then I ripped a vintage book page into a suitable sized piece and using Soft Matte Gel, glued it to the tag. I covered the whole tag with a layer of Soft Matte Gel, too, as I wanted to be sure the papers won’t absorb paints unevenly.


Then, I added a nice dimensional layer, using Modeling paste and a Passiflora stencil. As I am such a vintage girl, I wanted to do my usual routine and painted the whole tag with a mix of Impasto paints Pitch Black and Dark Chocolate and wiped most off with a baby wipe. 


Next step was to choose images for my two tags. For one, I used a print I had scanned from a vintage photo, and for another I used an image sticker from the Finnabair Words You Need Sticker Book. I glued the images in place and applied a coat of Soft Matte Gel on top, to protect the surface.


The basic tag was now ready, but a bit of decorating was still needed, so I took a piece of tea dyed cheese cloth and glued it underneath the image and stapled a paper flower (also tea dyed) and a very messy bunch of linen cord on top. Then I glued a heavy paper piece I had printed, with text (also tea dyed), underneath the image, too, and with a palette knife applied just a hint of Golden Dragon Effect Paste around the tag, to give it a sunshine effect. As the final touch, I dotted a couple of Diamond Art Pebbles here and there.  


And that was it. It took longer for you read this than it would actually take to create a tag, so have a nice, cool glass of your favourite summer drink (mine is homemade strawberry and rhubarb juice), wear your comfiest summer dress, and have a relaxing creative moment, celebrating life, summer, and all things magical.


Here’s a link to my tutorial video:  https://youtu.be/xVkT7bugiXY

Thank you so much for popping by! 

Emilia


MATERIALS USED:


https://mixedmediaplace.com/prima-art-basics-soft-matte-gel


https://mixedmediaplace.com/prima-finnabair-stencil-passiflora


https://mixedmediaplace.com/prima-art-basics-modeling-paste


https://mixedmediaplace.com/prima-art-alchemy-impasto-paint-dark-chocolate


https://mixedmediaplace.com/prima-art-alchemy-impasto-paint-pitch-black


https://mixedmediaplace.com/prima-art-extravagance-golden-dragon-effect-paste


https://mixedmediaplace.com/prima-art-daily-words-you-need


Art Pebbles, Diamonds


Sunday, 13 June 2021

Finnabair Art Recipe June 2021 - Canvas

I had started this canvas months and months ago, when I had wanted to give my subconscious a voice to be heard. I mean, sometimes it is quite nice to start a project without having a single thought in your head. Just let your hands pick up materials and have a go. This canvas was the result of those mindful, quiet moments of creativity.


I had an empty 30x30cm canvas I picked as the base and started to glue wrinkled cardboard (from a cardboard package) and Moda Tissue Paper randomly on it, using Soft Matte Gel, primed the whole thing with white Heavy Gesso, and added some ornamental dimension in form of Iris Tapestry stencil and Icing Paste White Gold, with a slab of White Sand Texture Paste here and there. And on a whim, added a layer of Impasto Snow White on top of everything, to get a simple background where a hint of golden glimmer shined through.


Only then I started to think what to do with the canvas, and simply dived into my endless supply source of driftwood and seashells; our family has (or had, it’s covid time with no travelling right now) a habit to drag at least one luggage full of seashells, sea glass, and driftwood from our travels, so there is way, way more of those than I could ever use, which means, I always use them as part of my embellishments. 


So, I attached the ones appealing to me right there and then, with Heavy Body Gel, one by one, together with a happy mixture of a broken gear (I had used the large Gear mould with air dry clay, and dropped and broke the largest gear, but it fitted in perfectly here), vintage clock hands, and Finnabair mechanical embellishments with some Melange Art Pebbles.


Then I painted most over with Heavy Gesso and added a mixture of gesso with Mini and Mega Art Stones here and there, to add more dimension. I still had no idea for the colouring but thought I’d start with Liquid Acrylics, my all-time favourites, thinking about a misty morning in an otherwise empty beach with no sound but those of gentle waves and of seagulls calling, and our family leaving foorprints in the low tide sand, breathing fresh air and memories on the making. With a mist sprayer in one and a brush in the other hand, I started applying colour into the canvas. Only a little, painting a distant echo of that misty morning of my dreams. I used Titanium White, Burnt Sienna, Ink Black, and Prussian Blue. At that point I wasn’t satisfied with the look, and thought I’d continue later.


And later it was, by some months, as I simply forgot the whole canvas… I digged it up for this Art Recipe, immediately realizing what was missing: some Gold Metallic Flakes and Light Patina Metallique acrylic paint. And indeed, it did not need anything else, but a softest touch of gold flakes resembling rising sun, and Light Patina blue – which I added only a little here and there, spraying a lot of water to make it blending into the canvas like morning mist gently rolling in the horizon. And the canvas will always remind me of that magical morning in a faraway beach, of the echo of seagulls, of five pair of footsteps in sand and of a happy, contented heart.


Emilia


MATERIALS USED:


https://mixedmediaplace.com/prima-art-basics-heavy-gesso-white


https://mixedmediaplace.com/prima-art-basics-heavy-body-gel


https://mixedmediaplace.com/prima-art-basics-soft-matte-gel


https://mixedmediaplace.com/prima-finnabair-tissue-paper-moda


https://mixedmediaplace.com/prima-art-extravagance-icing-paste-white-gold


https://mixedmediaplace.com/prima-finnabair-stencil-iris-tapestry


https://mixedmediaplace.com/prima-art-ingredients-art-stones-mini


https://mixedmediaplace.com/prima-art-ingredients-mega-art-stones


https://mixedmediaplace.com/prima-finnabair-mould-large-gears


https://mixedmediaplace.com/prima-art-extravagance-texture-paste-white-sand-tube


https://mixedmediaplace.com/prima-art-extravagance-jewel-effect-paste-golden-dust


https://mixedmediaplace.com/prima-art-extravagance-gilding-glue


https://mixedmediaplace.com/prima-art-ingredients-metallic-flakes-gold


https://mixedmediaplace.com/prima-art-alchemy-impasto-paint-snow-white


https://mixedmediaplace.com/prima-art-alchemy-liquid-acrylic-ink-black


https://mixedmediaplace.com/prima-art-alchemy-liquid-acrylic-prussian-blue


https://mixedmediaplace.com/prima-art-alchemy-liquid-acrylic-burnt-sienna


https://mixedmediaplace.com/prima-art-alchemy-liquid-acrylic-titanium-white


https://mixedmediaplace.com/prima-art-alchemy-metallique-light-patina


https://mixedmediaplace.com/prima-art-alchemy-metallique-ancient-coin


https://mixedmediaplace.com/prima-mechanicals-metal-blooms


https://mixedmediaplace.com/prima-finnabair-mechanicals-woodland-ferns


https://mixedmediaplace.com/prima-art-ingredients-melange-art-pebbles


Rustic Knobs 967130


Rustic Gears 963439


Tuesday, 20 April 2021

Create Art - Vintage Tag for Finnabair

To celebrate spring that has finally arrived here in Finland, I wanted to create a tag, light and hopeful with first rays of spring, but still having a bit of dark, long winter in it.

I covered a sturdy carboard tag with Finnabair Musica tissue paper, attaching it with Soft Matte Gel and making sure the tissue paper was nicely crumbled. Then I primed the tag with a gentle layer white Heavy Gesso. 

I covered a sturdy carboard tag with Finnabair Musica tissue paper, attaching it with Soft Matte Gel and making sure the tissue paper was nicely crumbled. Then I primed the tag with a gentle layer white Heavy Gesso.


Next step was layering. I cut a 7 Dots Studios scrapbook paper piece slightly smaller than the tag and another one slightly smaller than the first paper and crumbled them so that they were a bit ripped and worn out from the edges. Then I glued them to the tag, larger one first and the smaller one on top, adding glue only to the middle and leaving the edges free. Then, I took some vintage paper scraps and tea bag material and with Soft matte Gel layered them on top, adding tea bag paper also here and there onto the bottom layer paper and onto the tag itself. After that, I painted a thin, gentle layer of white gesso on top.


Being me, I wanted softness in form of fabric and lace into my tag, so I attached some with Soft Matte Gel, and again primed everything with white gesso. After that, I used Iris Tapestry stencil and Modeling Paste, I applied an uneven layer of stencil images all around the tag but making sure that there were also empty spaces left.

I had a Re.design with Prima flower mould resembling a dried flower stem still standing after long winter months that was just perfect for the tag, so I primed it with gesso.  Then I painted over with a mix of Impastos Pitch Black, Snow White, Linen, and Dark Chocolate and wiped some of the paint off with a baby wipe, leaving only a soft layer of paint. I attached the mould figurine into the tag with Heavy Body Gel and added a chipboard word clipping to the tag for balance.


Then I used the same mix of Impastos Dark Chocolate, Pitch Black, Snow White, and Linen and gently painted the edges of the tag and the layers and also shadowing around the flower mould and the word clipping, using a wet brush and only a little paint and spraying the paint mix to spread and blend into the tag naturally and wiping any too dark paint off with a baby wipe. To deepen the shadowing, I used only a hint of Liquid Acrylics Ink Black, Umber, and Burnt Sienna, and repeated the process for some places. 

The tag needed some gentle hint of sky colour, so I added a soft layer of Metallique paint Light Patina here and there, spraying it for blending.

As finishing touches, I first highlighted the flower and some parts of the tag layers with Gold Metallic Flakes and used Gilding Glue for attaching a hint of it into place, brushing most flakes off and leaving only a soft glimpse of gold. Then I sprinkled some white paint splashes all over the masks using Impasto Snow White and very wet brush. I added an antique bronze eyelet to the tag hole, and tied a matching coloured, botanically hand dyed cotton lace ribbon to the tag. Last, using Heavy Body Gel I attached a half of a Rusty Paper Clip with a word Inspire on it onto the layer on top of the tag, and a Scrapyard Dragonfly to the flower.

And it was ready, a soft and gentle tag celebrating the spring and saluting the winter, while reminding that whether it was a light springtime or dark winter time, there is still beauty, art and creativity everywhere inspiring us.


There’s a tutorial   video on my YouTube, too!

Wishing you creative moments,

Emilia


Please visit the material list here, I am sorry, I managed to lost in from my files...

https://tworzysko.blogspot.com/2021/04/create-art-vintage-tag-by-emilia-tapiola.html


Monday, 12 April 2021

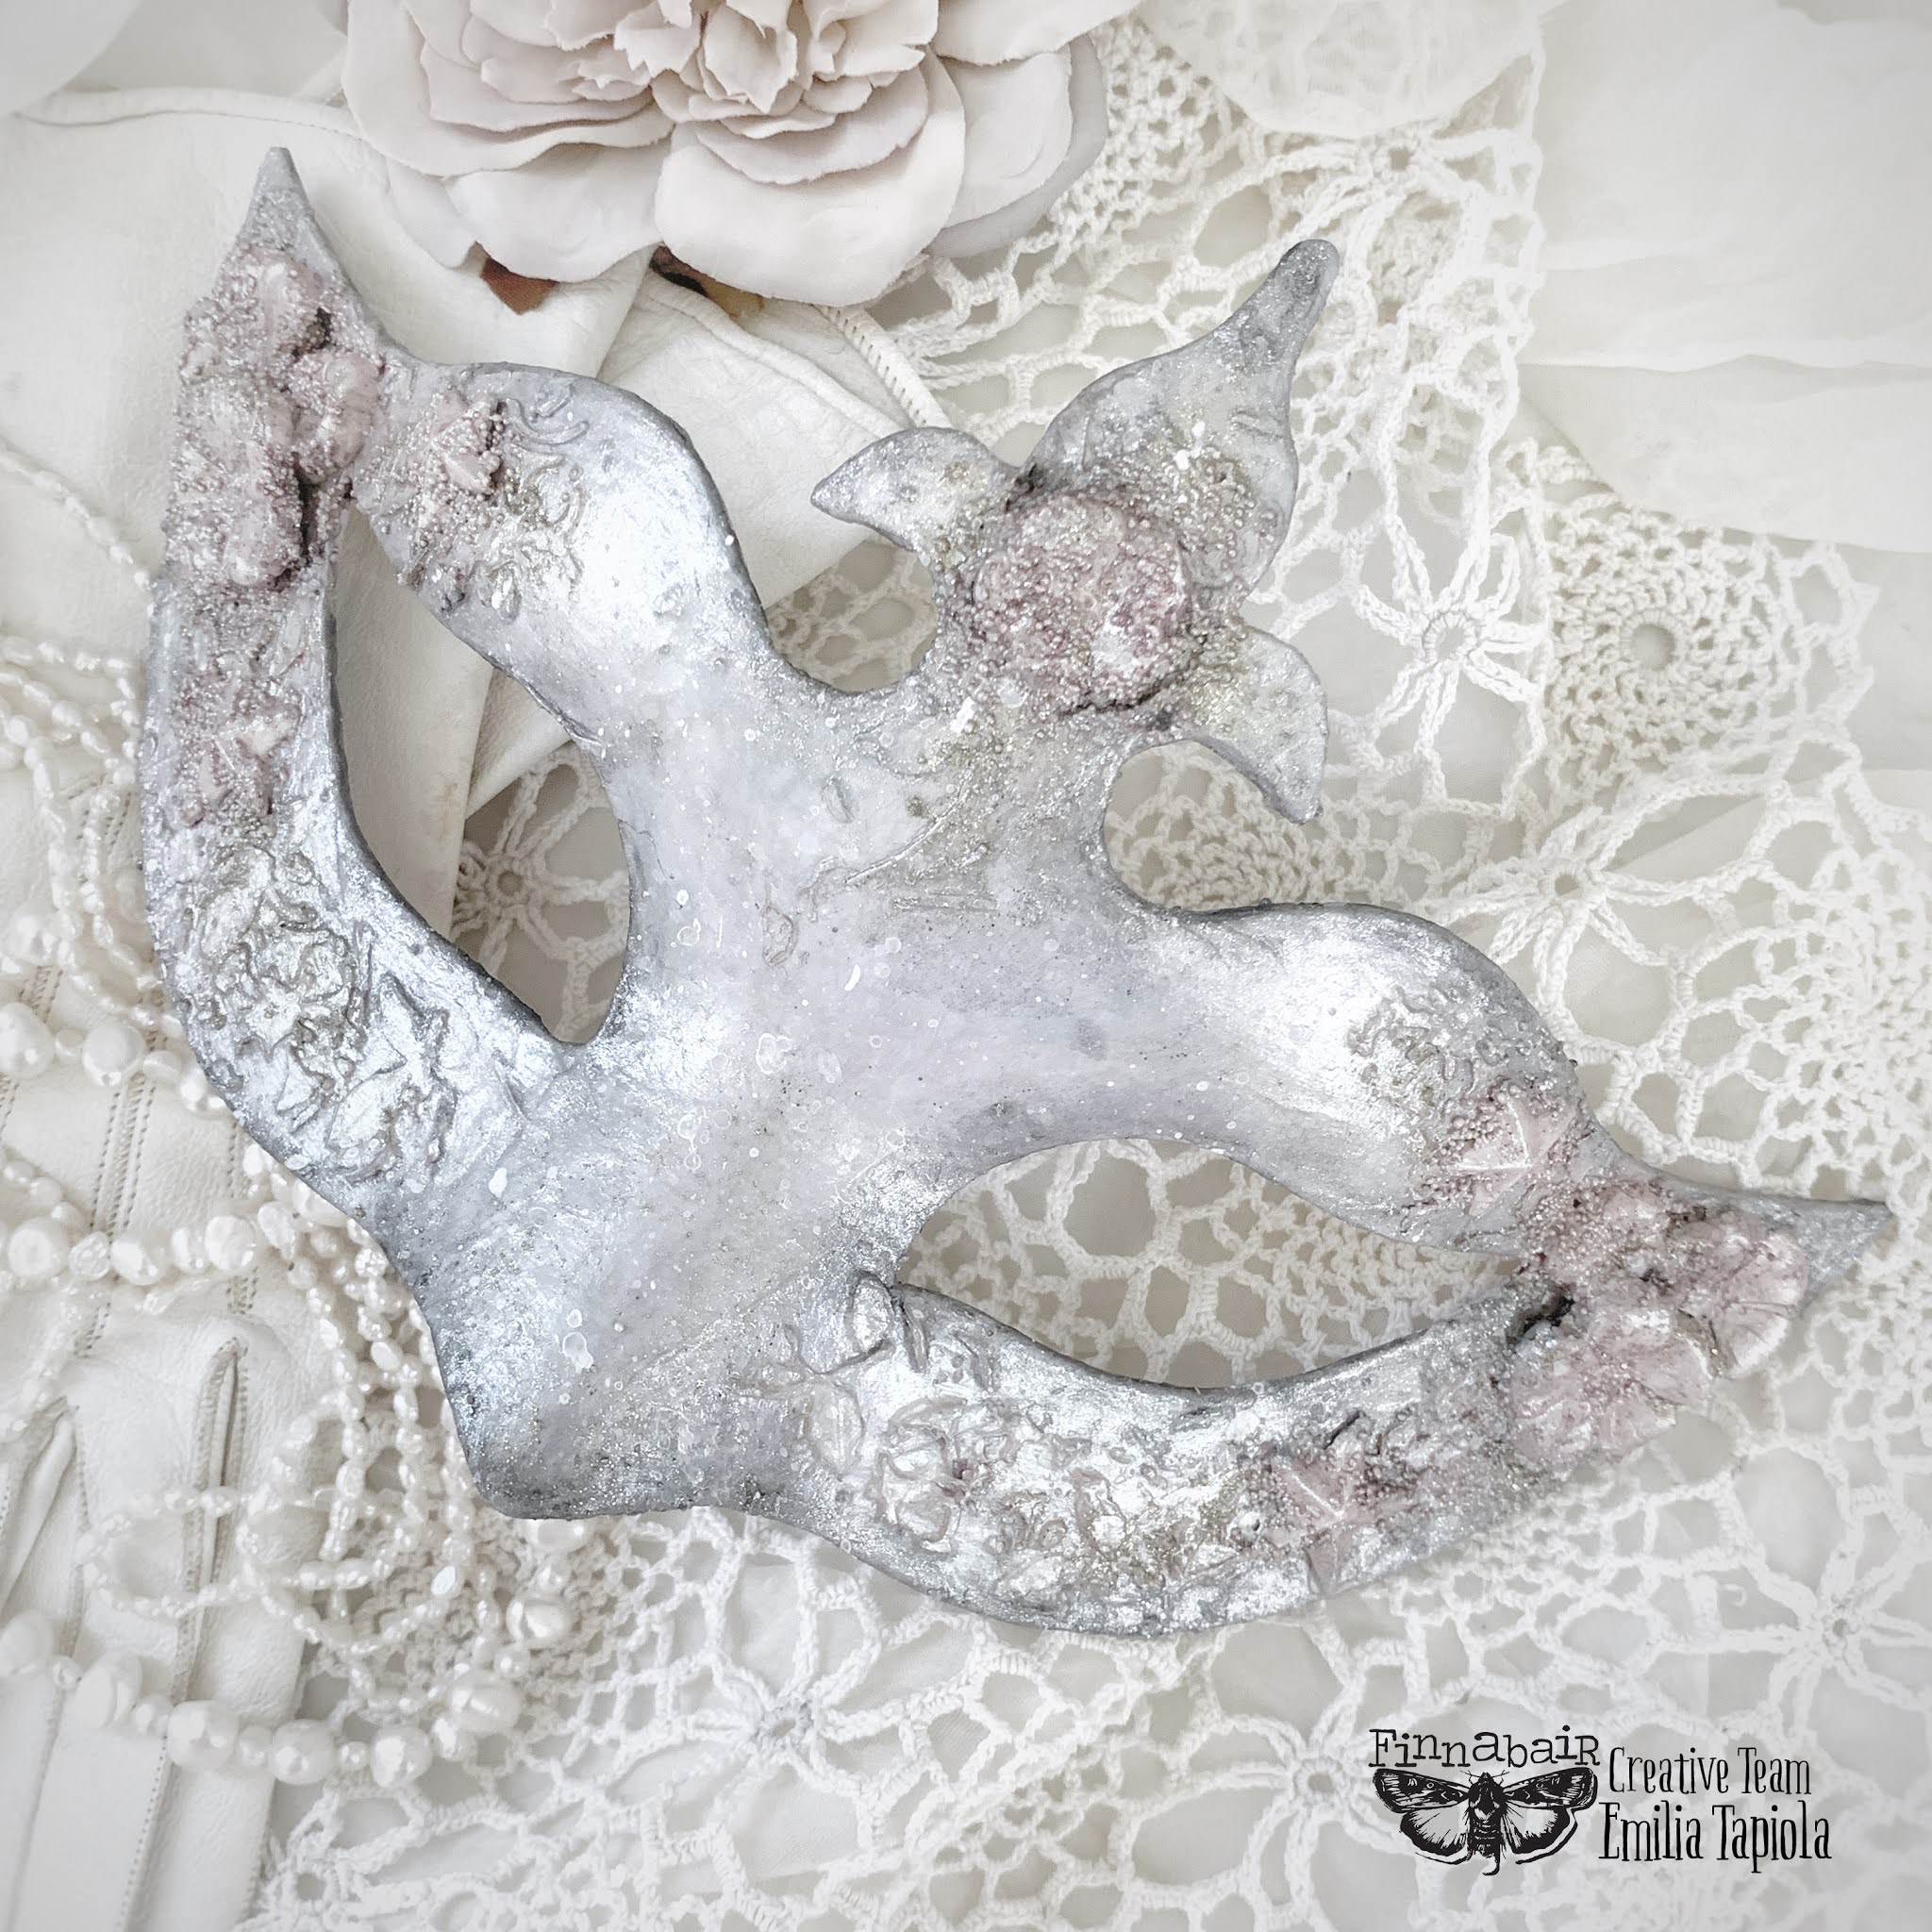
Finnabair Art Recipe April - Dreamy Spring Masks


In an blink of an eye, it’s the first of May, so I thought creating some pretty pastel coloured masks would be a lovely way to welcome spring, May, and light nights coming.


I wanted to be the idea simple, so incredibly simple that this would be a project easily done, even with children. I had a couple of paper mâché half masks, so I did two different shapes just to show that the idea is versatile of pretty much any kind of masks.


The masks had a bit rough surface so, using scraps of Finnabair Flutter tissue paper and Soft matte Gel, I covered the masks, making sure that I had all the edges and eye holes neatly covered, too. Then, I primed the masks with white Heavy Gesso and then painted them with a mix of Impastos Lavender and Snow White.


Next, using Finnabair stencil Passiflora and Frosty Pearl Icing Paste, I created some flowery depth, following the outline and edges of my masks. The intricate pattern made so beautiful lacey outlook onto the masks it was really a shame to put anything on top, but as I had moulds in my mind, moulds it was. (Adding moulds is the part you could easily skip if you do this with kids and want an instant result!) I wanted to create masks looking like clear spring morning sunrise, filled with sparkling hope.


Using Art Noveau, Flower Queen, and Nocturnal Elements moulds by Finnabair, I made some lovely flowers and stars with air dry clay and let them dry overnight. Next day, I attached them with Heavy Body Gel and let dry again. I also added a bit of Soft Matte Gel around the clay motifs and sprinkled Mini Art Stones to kind of tie the flowers and stars and the mask together.


After I was sure the masks were completely dry and safe to start painting over with, I continued. (This is why I told you that if you want to create masks with children or you are in a hurry, you can easily skip the mould part and stick to some beautiful stencil pattern – or add paper flowers etc.)


First, I used Metallique Opal Magic Aqua Rose for painting the clay motifs and around them, next I painted the edges of the masks with Opal Magic Pink-Blue. I highlighted the paints here and there with a hint of Vintage Rose for the pink parts and Light Patina for the blue parts and blended the two colours a bit with Liquid Acrylic Titanium White in the middle of the masks.


To add some structure and depth, I mixed Impastos Dark Chocolate, Pitch Black, and Linen for some shadowing and gently painted the edges of the masks, including eye holes, and blended the shadowing with baby wipes so that the dark shadowing was as delicate as possible. I did the same with and around the clay motifs.


As the finishing touch, I highlighted the pink parts with Jewel Paste Rose Quartz and blue parts with Jewel Paste Diamond Rings and added a hint of Golden Dust Jewel Paste here and there for warmth. I only used Jewel Pastes a little, with wet brush and sprayed water to blend them even more, as I wanted soft glimmer not instantly visible. And after the Jewel Pastes were dry, I sprinkled some white paint splashes all over the masks using Impasto Snow White and very wet brush. These matte sprinkles balanced the shiny metallic paints and Jewel pastes and made the masks look like they were hundreds of stars shining gently in the morning sky, welcoming a new day.


Wishing you beautiful moments in soft, dreamy colours,

Emilia


MATERIALS USED:


https://mixedmediaplace.com/prima-art-basics-heavy-gesso-white


https://mixedmediaplace.com/prima-finnabair-tissue-paper-flutter


https://mixedmediaplace.com/prima-art-basics-soft-matte-gel


https://mixedmediaplace.com/prima-art-extravagance-icing-paste-frosty-pearl


https://mixedmediaplace.com/prima-finnabair-stencil-passiflora


https://mixedmediaplace.com/prima-finnabair-mould-flower-queen


https://mixedmediaplace.com/prima-finnabair-mould-art-nouveau


https://mixedmediaplace.com/prima-finnabair-mould-nocturnal-elements


https://mixedmediaplace.com/prima-art-basics-heavy-body-gel


https://mixedmediaplace.com/prima-art-ingredients-art-stones-mini


https://mixedmediaplace.com/prima-art-alchemy-impasto-paint-dark-chocolate


https://mixedmediaplace.com/prima-art-alchemy-impasto-paint-linen


https://mixedmediaplace.com/prima-art-alchemy-impasto-paint-pitch-black


https://mixedmediaplace.com/prima-art-alchemy-impasto-paint-snow-white


https://mixedmediaplace.com/prima-art-alchemy-impasto-paint-lavender


https://mixedmediaplace.com/prima-art-alchemy-metallique-vintage-rose


https://mixedmediaplace.com/prima-art-alchemy-metallique-light-patina


https://mixedmediaplace.com/prima-art-alchemy-opal-magic-aqua-rose


https://mixedmediaplace.com/prima-art-alchemy-opal-magic-pink-blue


https://mixedmediaplace.com/prima-art-alchemy-liquid-acrylic-titanium-white


https://mixedmediaplace.com/prima-art-extravagance-jewel-effect-paste-diamond-rings


https://mixedmediaplace.com/prima-art-extravagance-jewel-effect-paste-rose-quartz


https://mixedmediaplace.com/prima-art-extravagance-jewel-effect-paste-golden-dust